
Hello there! Ever wondered why your favorite pair of shell toe sneakers turn yellow over time? I have good news for you, it’s not your fault, and better news – I’ll teach you how to fix it.
Why Do Shell Toes Turn Yellow?
Now onto the not-so-great part, why your beloved shell toes turn yellow. Shell toe sneakers often get discolored due to oxidation, a natural process caused by exposure to air and light.
Materials such as rubber and leather are most prone to this. Imagine leaving a piece of apple out on your counter, and it starts turning brown – same principle.
Environmental factors, such as dust, dirt, and even sweat, can also contribute to this yellowing effect.
Other potential causes could include cleaning product residues or spillages, and even, surprisingly, some of the protective sprays meant to prevent stains.
While it’s nearly impossible to avoid all of these causes entirely, being aware of them allows us to take preventive measures.
Preparations Before Cleaning

Cleaning your shell toe sneakers is not rocket science, but it does require some preparation. The right cleaning materials and a clear understanding of the cleaning process are crucial to prevent further damage and to effectively remove the yellowing.
Gathering Cleaning Materials
Before we get down to business, you’ll need to gather some cleaning materials. Here’s what you’ll need:
- Soft cloth or sponge
- Mild soap
- Warm water
- Soft-bristle toothbrush
- Baking soda
- Hydrogen peroxide
- A bowl or small bucket
Every single item listed has its role in the cleaning process. The soft cloth is ideal for wiping down the shoe, the soap and warm water create a gentle cleaning solution, and the soft-bristle toothbrush is perfect for reaching the crevices of the shell toe.
The real magic happens when the baking soda and hydrogen peroxide come together, working wonders to brighten those yellowed toes. Don’t worry if you don’t have hydrogen peroxide; white vinegar is a suitable alternative.
Understanding the Cleaning Process
Once you have your cleaning materials, it’s important to understand the cleaning process. It isn’t just about making your sneakers look good – you want to do it in a way that won’t cause damage. Being gentle and careful during cleaning is crucial. That’s why we’re using a soft cloth and a toothbrush, not anything that could scratch or tear your sneakers.
When cleaning your sneakers, especially the shell toe area, think of it as though you’re brushing your teeth. You wouldn’t brush your teeth so hard that your gums bleed, right? So don’t scrub your sneakers so harshly that you damage the materials. The process we’ll follow is a gentle, step-by-step one that will help you restore your sneakers to their former glory.
Pre-Cleaning Checks
Before getting your hands dirty, it’s wise to give your shoes a pre-cleaning check. This involves looking for any signs of damage or excessive wear that might be worsened during cleaning. Be particularly vigilant for any cracks in the rubber shell toe as the cleaning solutions could seep in and cause further discoloration.
In addition, it’s crucial to identify the materials used in your particular pair of shell toe sneakers. Are they leather, synthetic, canvas, or suede? Different materials respond differently to cleaning methods and solutions.
For instance, suede is more delicate than leather and might require a suede-specific cleaner. Therefore, knowing your sneaker’s material composition will allow you to adjust your cleaning techniques accordingly.
Step-by-Step Guide to Cleaning Yellow Shell Toe

Now, we’re getting to the heart of the matter – the cleaning process. By the end of this section, you’ll be equipped with a foolproof strategy to tackle those yellowed shell toes. Buckle up, because it’s time to transform your sneakers!
1. Removing Loose Dirt and Dust
Cleaning your shell toe sneakers begins with the removal of loose dirt and dust. It’s a crucial first step, as you don’t want to scrub this surface grime further into the shoe material. Using a soft cloth or a soft-bristle brush, gently wipe off any loose dirt, paying special attention to the shell toe area. This process should be done slowly and meticulously to ensure all areas are clean before proceeding to the next step.
The loose dirt and dust aren’t always visible to the naked eye, but trust me, it’s there. When this dirt mixes with water, it forms a type of ‘mud’ that can be more challenging to clean. By taking a few minutes to complete this step, you’ll make the rest of the cleaning process significantly easier.
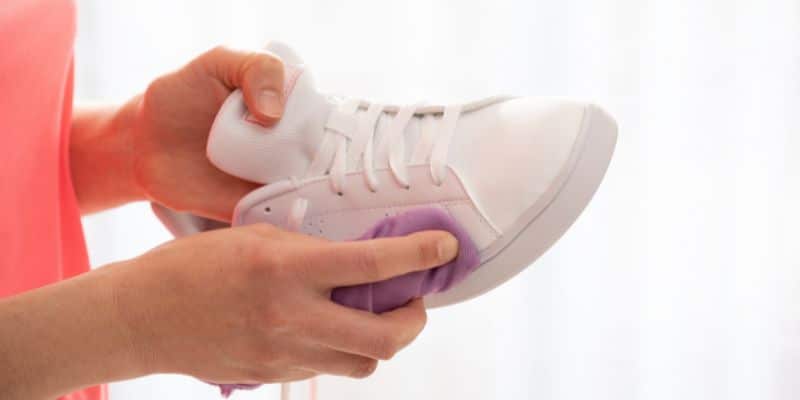
2. Cleaning the Shell Toe with Soap Solution
Next, you’ll need to prepare a mild soap solution. This can be done by mixing a small amount of soap with warm water. Dip a soft cloth or sponge into the solution and gently wipe the entire shoe, focusing on the shell toe area. You might be tempted to scrub vigorously, but resist the urge. The goal is to apply just enough pressure to clean without causing damage.
After applying the soap solution, use a damp cloth to rinse off the soap. It’s important to remember not to soak your shoes during this process; excessive water can damage certain materials. If there’s stubborn dirt or grime remaining, you can use the soft-bristle toothbrush to gently scrub these areas. Just remember – gentle is the name of the game.
3. Scrubbing the Shell Toe
While scrubbing, it’s important to choose the right tool. A soft-bristle toothbrush is ideal for this task, as it provides enough scrubbing power without damaging the shell toe. If a toothbrush is not available, a nail brush or a soft cleaning brush can also do the trick.
When scrubbing, work in a circular motion, applying light pressure. This technique helps lift the dirt and grime from the material, without causing scuffs or scratches. If you’re dealing with stubborn stains, you might need to repeat this step a few times. Remember to rinse the brush periodically to avoid redistributing the dirt.
4. Cleaning with Baking Soda and Hydrogen Peroxide
Now, it’s time for the real magic. Mixing baking soda and hydrogen peroxide creates a potent solution that can help whiten yellowed shell toes. To prepare the mixture, combine one tablespoon of baking soda with half a tablespoon of hydrogen peroxide in a bowl. Stir until it forms a paste.
Apply this paste onto the yellowed shell toe using your brush, and gently scrub in a circular motion. Let it sit for about 30 minutes to an hour, but keep an eye on it. If it starts to dry out, spray it with a bit of water. Once time is up, rinse off the paste using a damp cloth.
5. Rinsing and Drying
After all the scrubbing and treatment, it’s time to rinse your shoes. Use a damp cloth to gently wipe off any remaining cleaning solution, ensuring all the soap and paste are completely removed.
Properly drying your sneakers is just as important as the cleaning process. Any remaining moisture can lead to mold or mildew, or cause the material to break down over time. To dry your sneakers, first, blot them with a dry towel to remove any excess water. Then, stuff them with newspaper or paper towels to help absorb any remaining moisture from the inside. Let them air dry in a well-ventilated area, away from direct sunlight or heat, as these can cause the material to warp or discolor.
Prevention and Maintenance

Cleaning your yellowed shell toe is just one part of the equation. If you want to keep your sneakers looking fresh and bright, a regular cleaning and care routine is essential. Additionally, using shoe protectors and storing your sneakers correctly can prolong their lifespan and keep them looking their best for longer.
1. Regular Cleaning and Care
Routine cleaning can help prevent your shell toe sneakers from yellowing in the first place. Ideally, you should clean your sneakers after every wear, but I understand that’s not always feasible. At the very least, aim to give them a thorough cleaning once every two weeks.
Regular cleaning doesn’t have to be as in-depth as the process I’ve outlined above. Often, simply wiping your shoes with a damp cloth or using a shoe cleaning wipe will be sufficient to remove surface dirt and grime. Remember, the goal is to prevent dirt and stains from setting in, which can cause discoloration over time.
2. Using Shoe Protectors
Shoe protectors can be an excellent tool to help prevent your shell toe sneakers from yellowing. They come in various forms, including sprays and creams, and they work by providing a protective layer over your shoes that helps repel water, dirt, and other stain-causing substances.
However, be mindful of the type of shoe protector you choose. Some protectors may cause discoloration themselves, especially on lighter-colored materials. As with any new product, it’s always a good idea to test it on a small, inconspicuous area first to ensure it won’t cause any adverse reactions.
3. Proper Storage
Lastly, proper storage is essential in keeping your shell toe sneakers looking their best. Exposure to air and light can accelerate oxidation, causing your sneakers to yellow over time. To prevent this, store your shoes in a cool, dark, and dry place. Avoid places with high humidity, such as basements or bathrooms, as this can lead to mold or mildew.
If you’re storing your shoes for an extended period, consider using silica gel packets or shoe trees to help absorb any excess moisture. Also, if possible, avoid stacking your shoes on top of each other, as this can cause them to lose their shape.
Final Thoughts and Tips
The most important thing to remember is to be gentle. Scrubbing too hard or using harsh cleaning agents can do more harm than good. Also, prevention is key. Regular cleaning and proper storage can help prevent your shell toes from yellowing in the first place.
Now, go ahead and put your newfound knowledge to use! Your shell toe sneakers will thank you for it.


